


There are several tools and platforms, like Adobe Dreamweaver, available to help with web development. Some are more user-friendly for beginners than others.
However, regardless of the level of knowledge, one will be able to locate a site builder that is ideal for the requirements.
If one has never heard of Adobe Dreamweaver, it’s an Adobe tool that allows one to design, construct, and launch websites.
Statistically, Adobe Dreamweaver is presently utilized by 190,700 websites for web development, while in the past, around 4,598,071 websites also made use of this tool.
Adobe Dreamweaver’s easy visual interface enables even those who don’t know how to create a website or write codes undertake web development work.
What is Adobe Dreamweaver?

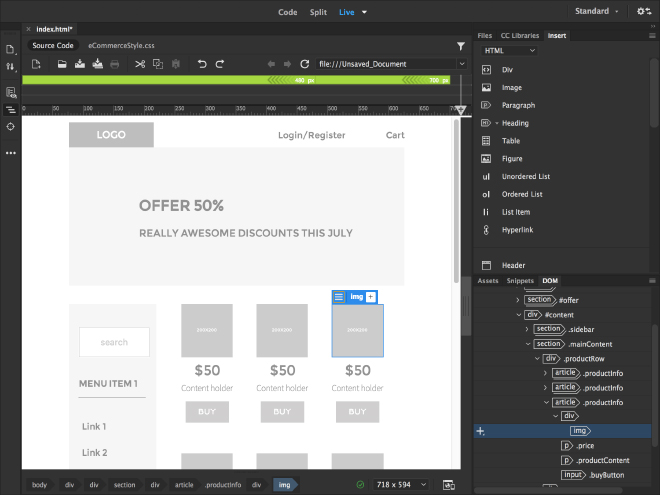
Adobe Dreamweaver, a web development tool is used by web designers and developers to create websites and apps that can be accessed via browsers, smartphones, and tablets.
Adobe Dreamweaver CS6 has an intuitive, user-friendly interface, improved jQuery Mobile compatibility, and software interaction with other Adobe-based products like Adobe PhoneGap and Adobe Business Catalyst.
It has a grid structure that enables multiscreen interfaces and the incorporation of CSS3 usages and administration.
Furthermore, Adobe Dreamweaver CS6 contains standard capabilities such as PHP custom class code hinting, live view rendering, quick site setup, user-friendly FTP synchronization, and CSS starting pages.
How to create a website using Adobe Dreamweaver?
1# Start a new web development project
Go to Site -> New Site on the Adobe Dreamweaver CC dashboard, and a window will appear.
The first step is to name and store the website in a single folder. This aids in file organization and facilitates the uploading process.
If one wishes to add photographs to the website, go to Advanced Settings -> Local Info. Within the site’s folder, an images folder should also be established. Click Save.
2# Make the Homepage File.
At this time, the web development workspace is empty. However, if one checks in the top-right panel on Adobe Dreamweaver, one should see the site’s files. Now one can start from scratch and construct the homepage file.
Navigate to File > New and select New Document. Click Create after selecting HTML as the document type. It is optional to give the document a title.
One will be returned to the Adobe Dreamweaver workspace and will see a white page with many lines of HTML code. This is where web development is right now.
Save the HTML file as index.html and put it in the site’s folder.
3# Make a Header
One will design the website’s header. This is generally the site’s logo and name.
On the Adobe Dreamweaver editor, click on the white page or select a specific location within the <body> element. Click Insert in the top-right panel.
This will display HTML components that may be added to the page.
4# Look for the element header.
If one simply clicks on it or drags it to the Adobe Dreamweaver workspace, it will be added to the website along with its code.
The header will then be converted into a heading using the H1>…/H1> tag. This is for SEO purposes and to educate search engines about the nature of the site.
Go to the Insert panel and choose the text in that area. Look for and choose the heading: H1.
Replace the text with the title of the website. Something detailed and representative is required. “Welcome to the Web Development Site” might be used here.
5# Include a Home Navigation
Add a line after the header by clicking return or enter to insert a navigation button. Now navigate to the Insert panel and look for the Navigation element.
A window will appear when users click it. Enter navigation as the ID and press OK.
The Adobe Dreamweaver editor will now have a navigation feature. Look for a hyperlink in the Insert panel when a user is in the element content.
Click it and fill in the required details.
Click OK. It now has a clickable home button, and more code lines have been added to the web development.
6# Make a CSS selector for your website’s title.
One may modify the typeface and center while web development is underway.
In the DOM panel, highlight the H1 under your header. Then, from the panel above, select CSS Designer.
Click the + symbol to the right of the selectors. It suggests a name such as #header h1 and hits return.
Additionally, the Manage Fonts menu will provide you with additional alternatives from the Adobe Dreamweaver Edge Web Fonts database.
Select the chosen font by clicking on it. When one is finished, it’ll update the font of the web development title and add the relevant code to the source code and style.css.
8# Change the Title Font
Ensure that the selectors point to #header h1.
To access the Layout, Text, Border, Background, and More choices, go to Properties and uncheck the Show Set box.
Click over font-family and select default font after selecting Text. It will provide one with several alternatives to pick from among the Adobe Dreamweaver options.
Furthermore, the Manage Fonts menu will provide additional alternatives from the Adobe Dreamweaver Edge Web Fonts database.
Select the chosen font by clicking on it. When one is finished, it’ll update the font of the web development title and add the relevant code to the source code and style.css.
9# Align the title to the center of the page.
Click over the text-align and click center in the Text option. One will notice the update and the insertion of new code into the style. CSS. Make any required adjustments to the content of this web development.
Adobe Dreamweaver may not appear to be as simple to use as programs like WordPress or Squarespace, but it provides significantly more capability.
This tutorial on how to create a website with Adobe Dreamweaver is the best place to start, but there’s a lot more to learn, and Adobe Dreamweaver is a great place to start.
If you are looking for business web hosting for your website, Exabytes provides the best business hosting in Malaysia.
To get in touch with our experts, contact us now.
Related articles:


")


